An AD1 preamplifier with Alexander Naydenov transformers
A while ago an email hit my inbox from
Alexander Naydenov introducing
himself as a starter in the audio transformer business. Read below for a part of the email he sent to me.
I've been an audio transformer winder for a local company for a few years. With time though, I realized that it was time to move on. I managed to learn a lot of know-how on my own, digging into the rare old ancient books and doing lots of experiments by myself. Recently, the decision has come to withdraw from this company and exerce the freedom to start one on my own.. ..if you are interested in having a pair of my transformers for review, please let me know. You can choose your type by parameters and choice of tube.
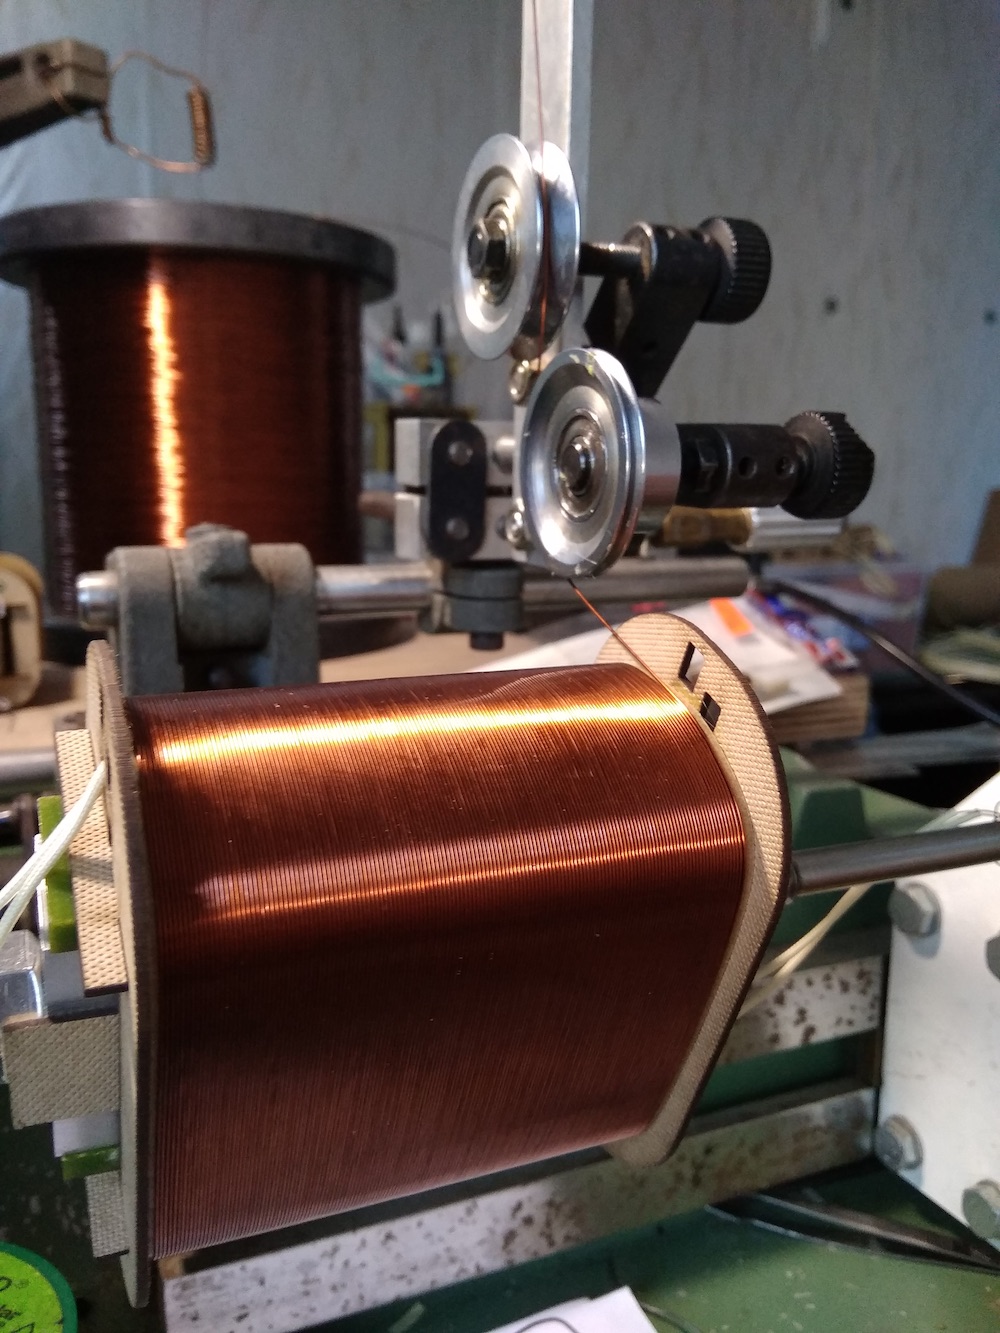
Way cool. After exchanging lots of emails and information I really got excited by the looks of the transformers and Alexanders' knowledge how to make these. Especially his view on what materials are used best for optimal sound and tone. As he explained me that he and his friends were able to hear differences in insulation materials and types magnetic wire. To be honest, what really got me going was the ability to tune the sound with small wood-chips placed in between the bobbins. Now here is a man who is not only into business but also into sound. He sent me some photo of his projects and I was really amazed by the sheer craftsmanship. See below for some pictures..
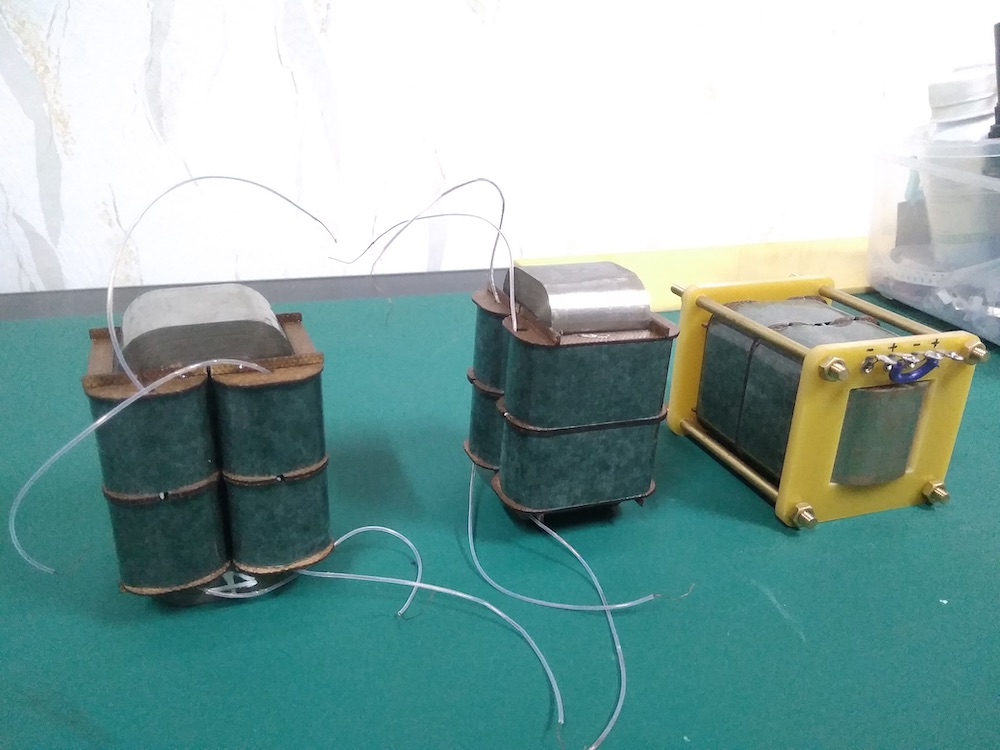
Arrived!
Just before christmas 2019 I received the package containing the line-out transformers. I wrote about it
on my blog calling them awesome transformers. They really are. Just look at the pictures, heaps of TLC have been
put into creating these.
Just unpacked.. 2.7:1 or 5.4:1 step-down, now set for 2.7:1..
At the right the little bag with the wooden tuning chips..
The preamplifier design.
As said on my blog, these deserve a good design. So what is a good design? To me that is a design that looks
good and performs good. Measurements are important as well but these should help in getting the sound right, not
the other way around. I have lots of preamplifiers, really, so I was aiming for something special. And so the AD1
came to mind. These are really special soundwize. If you have ever auditioned an amplifier with AD1 as output
triodes, you know what I mean. These were just about the last directly heated triodes developed, just before the
second world war where pentodes were developed which are far more efficient. If you look at the AD1 inner structure,
you can see that these were already far more efficient than, for example, the 45. Very tight specifications if you
look at the electrodes distances. And delivering almost 4 Watts output power at relative low high voltage and a 4
Watt filament. So my aim was to put these into a preamplifier design. I also had some American Walnut chassis made
with 2 mm copper top plates. Dark stained Walnut with copper and Alexanders transformers match really well..
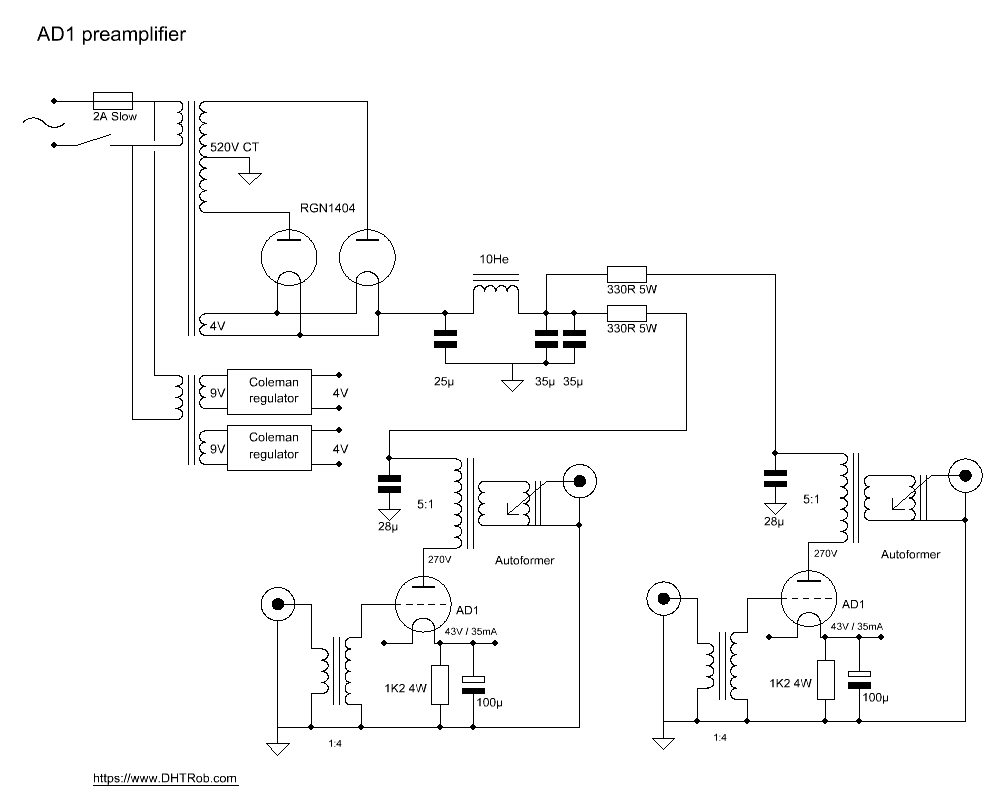
So far aesthetics. What about the schematic? I designed the voltage amplifier in the most simple way: attenuator,
AD1, line-out transformer, et voilá: AD1 amplifies four times and line-out transformer steps down by 2.7:1.
This is sufficient for me as my power amplifiers are sensitive enough to be driven at line-level. As attenuator I
choose the marvellous autoformers by Dave Slagle. I met
Dave at ETF.19 at which he brought the 28 position types with him. Some soldering to do. Now 28 steps is more than
the Elma switch can accomodate so the last 4 steps have 4dB attenuation where all other steps have 2dB attenuation
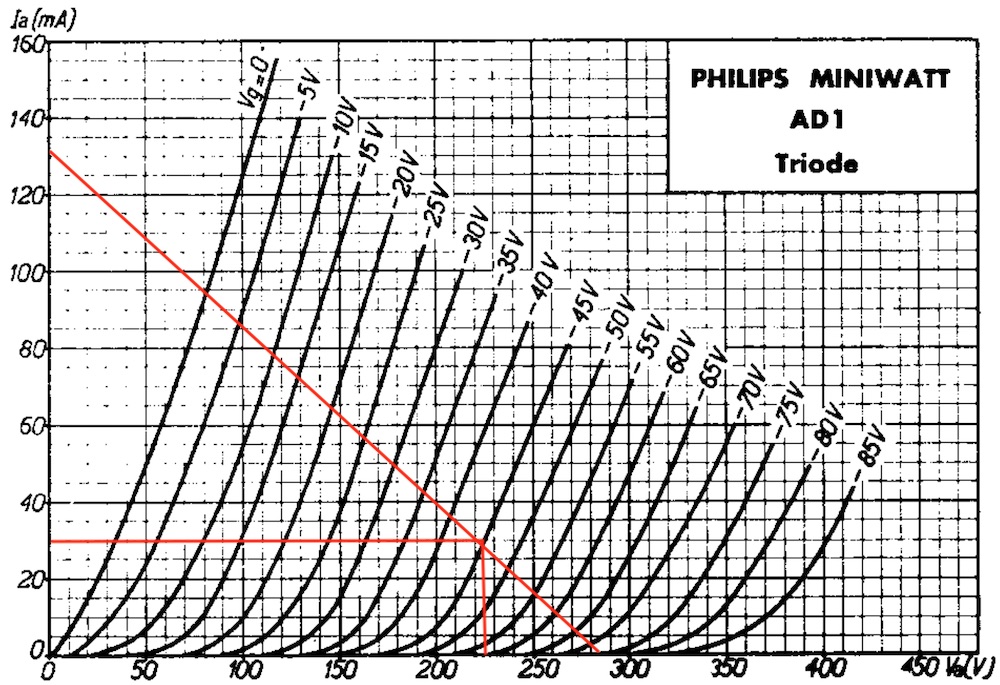
Operating point is mild compared to full duty as power valve. Slightly less then 300 Volts high voltage with 45 Volts
bias at 30mA should be sufficient for preamplifier duty. As you can see the loadline points out for around a 2K5
plate load.
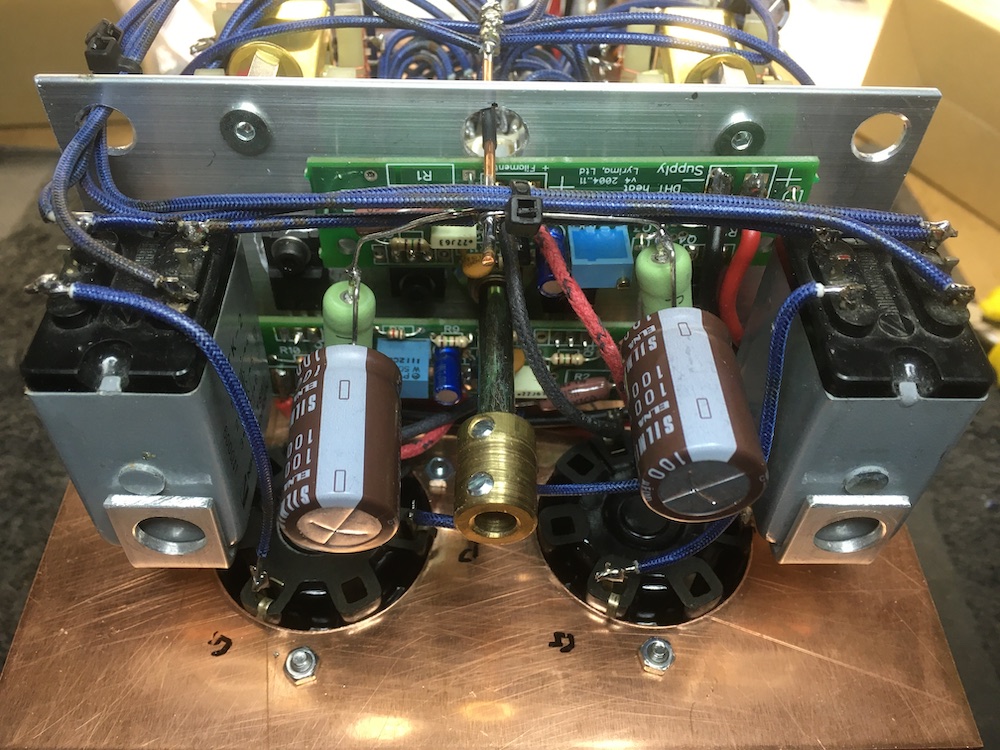
For a silent operation the filament needs to be fed a very well filtered DC-voltage of 4 Volts. Rod Colemans heater
supplies are well known for their silent operation and being non repellent to tone in sound. Voltage is rectified
in the power supply chassis and brought over to the preamplifier chassis by an umbilical-cord which carries the
high voltage as well. The Coleman heaters (or regulators) are bolted on an aluminum profile for cooling which is
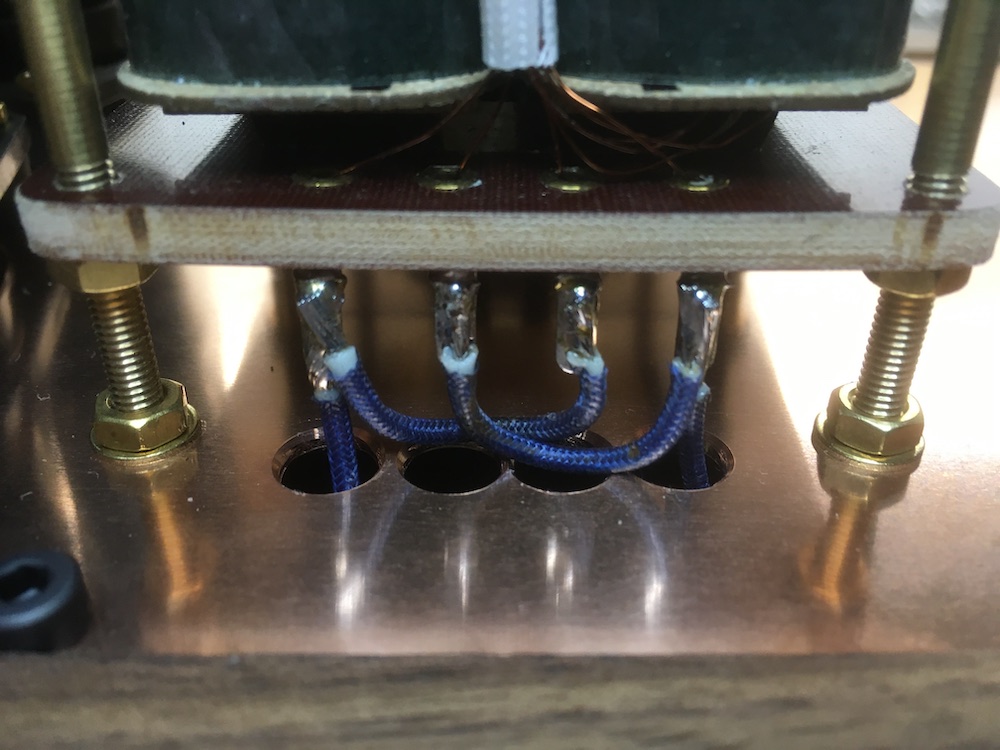
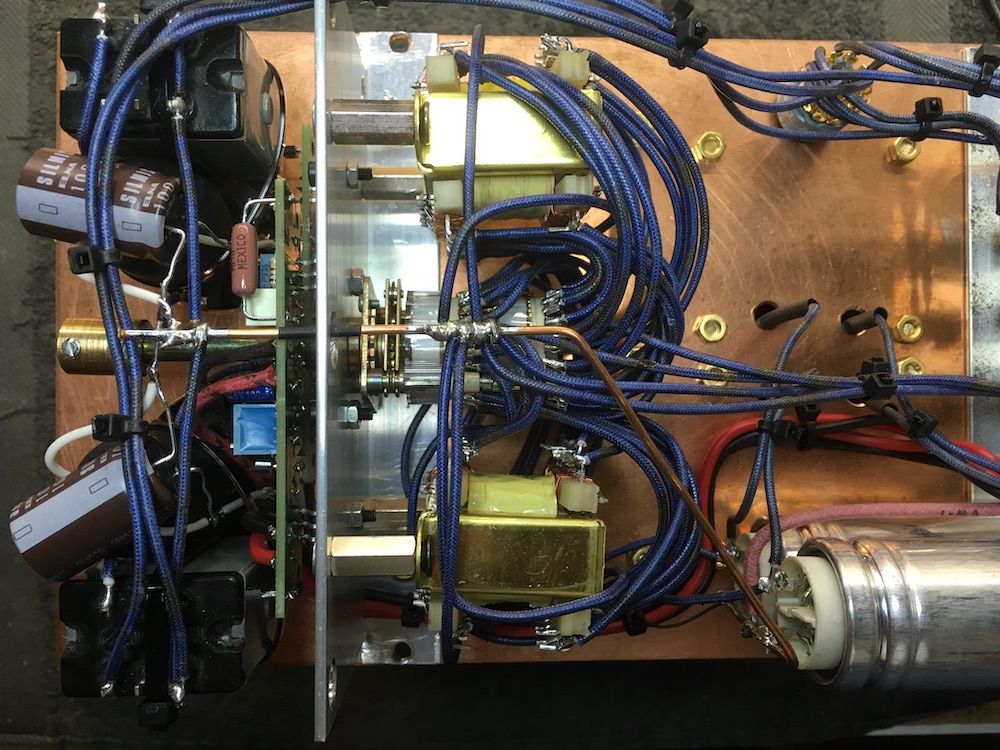
also used for mounting the attenuator switch. Line out transformers are placed on top of the copper plate behind
the AD1's. The side-contact socket (p-type) are mounted using double sided adhesive tape. Brass nuts and rings match
looks of Alexanders' transformers. The copper plate is fixed to the chassis using four M4 bolts. The copper top plate
supports all the components and can be taken out of the chassis for maintenance (or tuning).
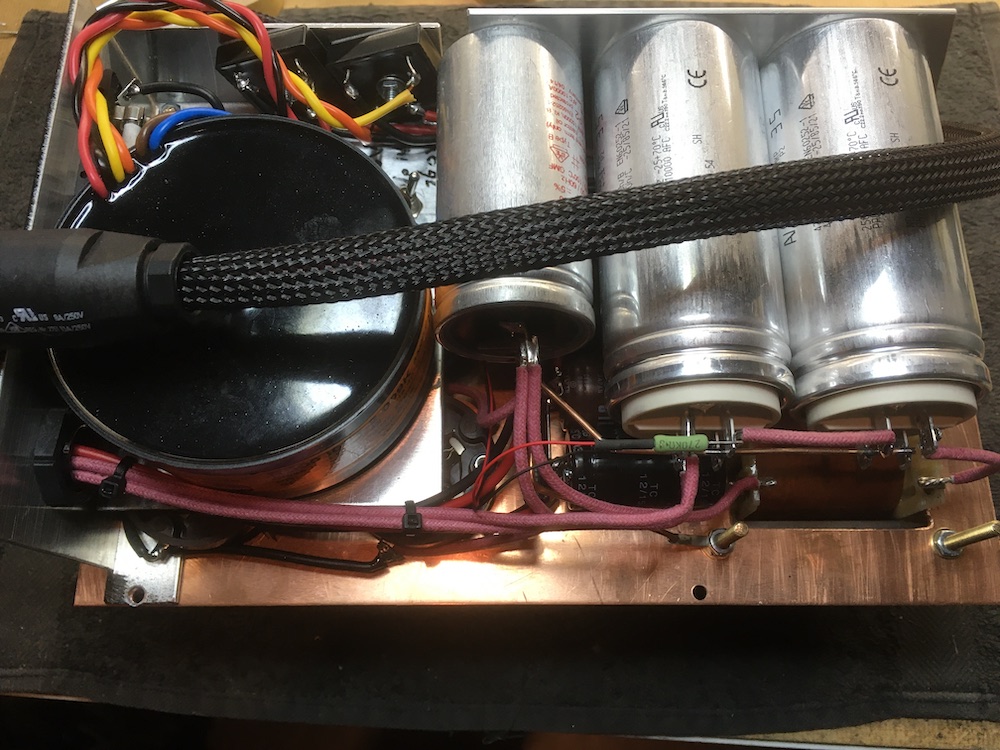
Side view of autoformer and 8µF MKP-in-oil capacitors..
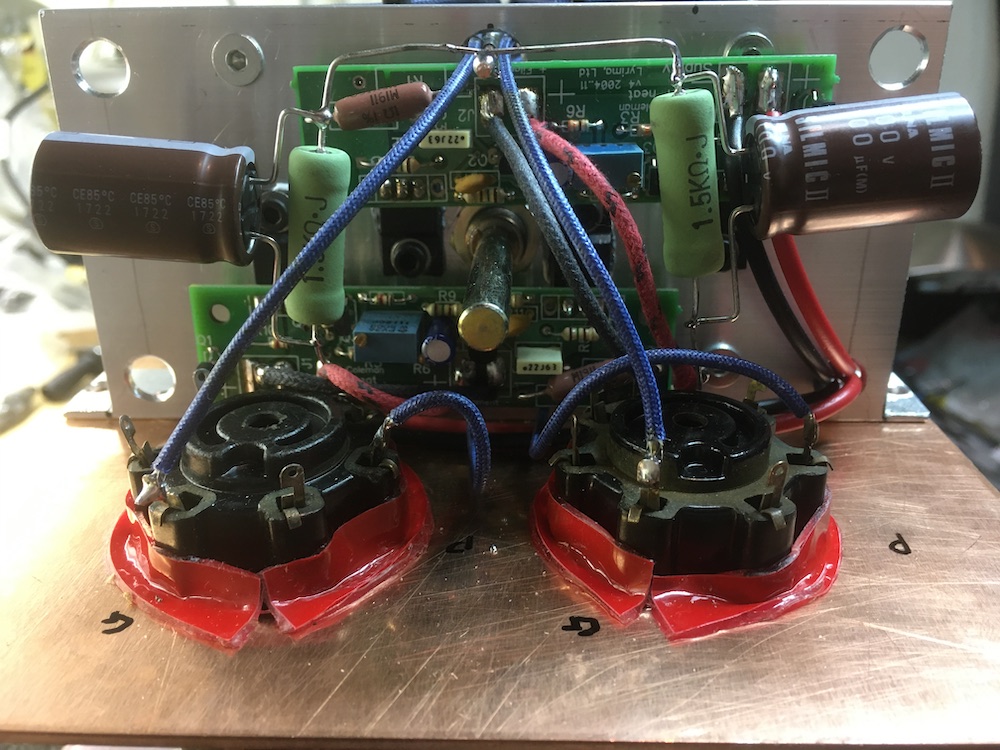
Front view looking at Coleman regulators and cathode components..
Topview showing all the components without the yet to be placed source selector switch..
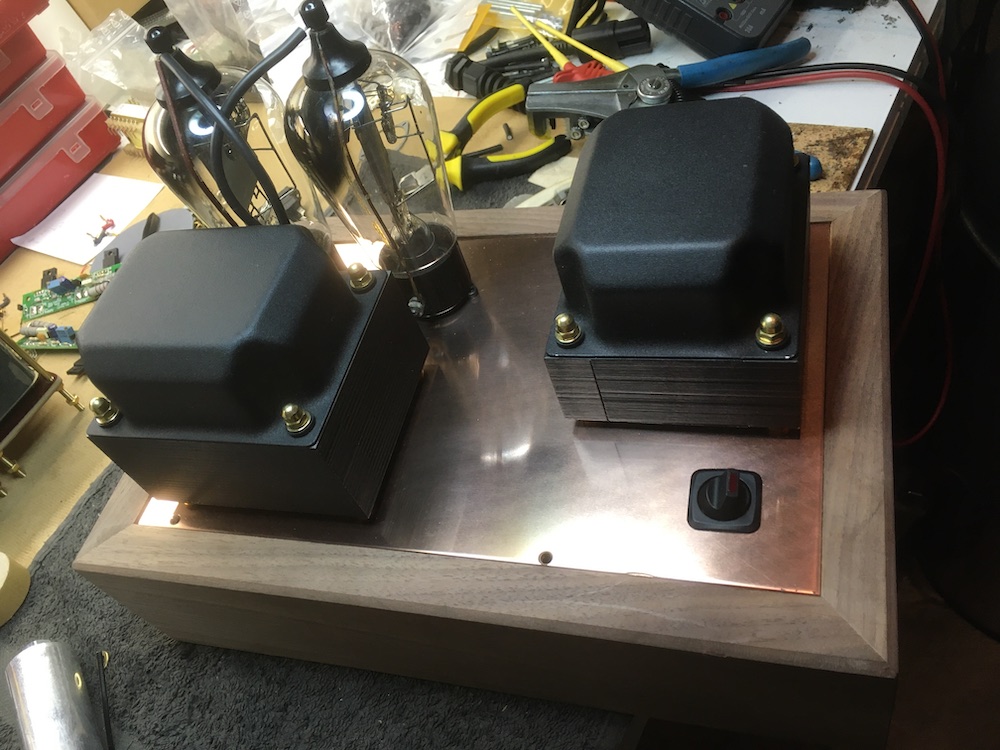
Preamplifier connected to power supply for setting the correct filament voltage..
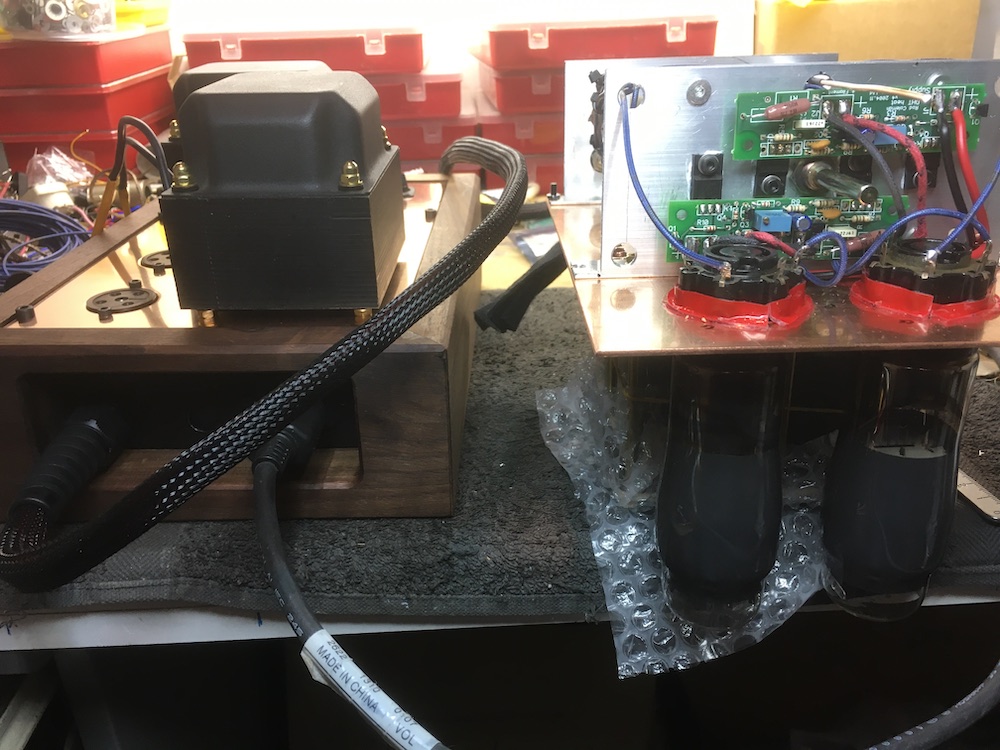
The power supply.
The separate power supply was to match the beauty of the preamplifier itself. Using the same chassis and top plate,
some old stock Stoet transformers and a toroid for the filaments. Probably Rod will sigh as he advises to
use split bobbin types for this, but space was an issue here (Rod Coleman heater supplies are used). Rectifiers are
half-wave TeKaDe 4G1000, just for their looks: as appealing as the old AD1's. Capacitors are all MKP-in-oil,
motor-run types from Arcotronics. All built in dual layers to be able to fit it all in the chassis. Like the
preamplifier the copper top plate supports all the components and can be taken out of the chassis. Taking
measurements showed that bandwidth is a whopping 3Hz up to 200Khz at -3dB. That is the whole system, including
the autoformers.. Nice!
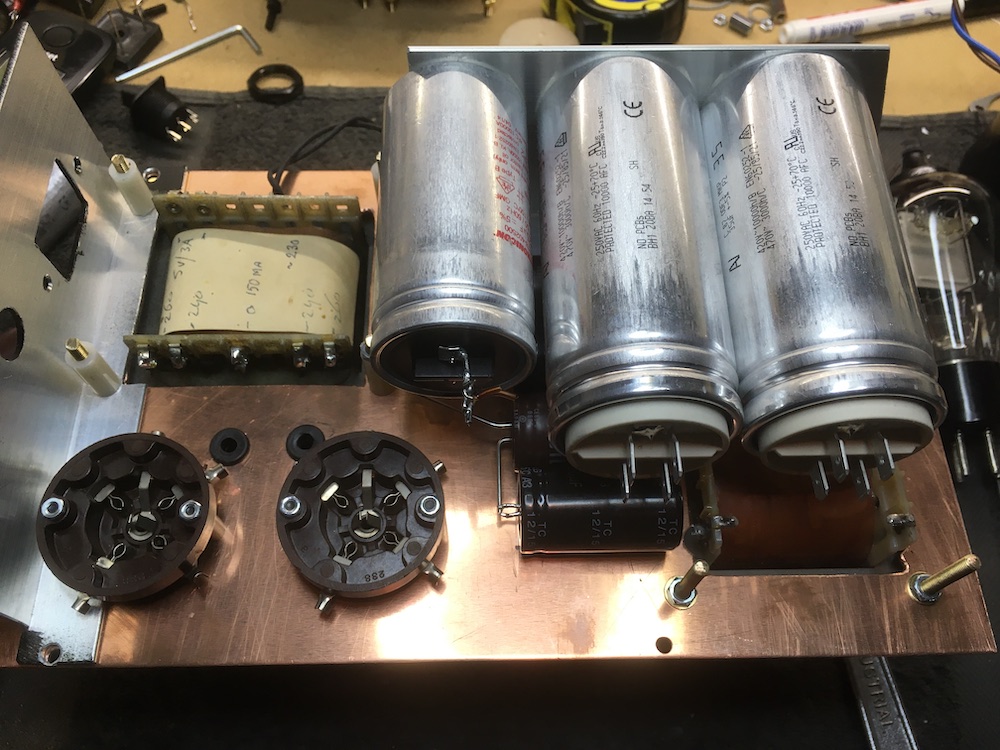
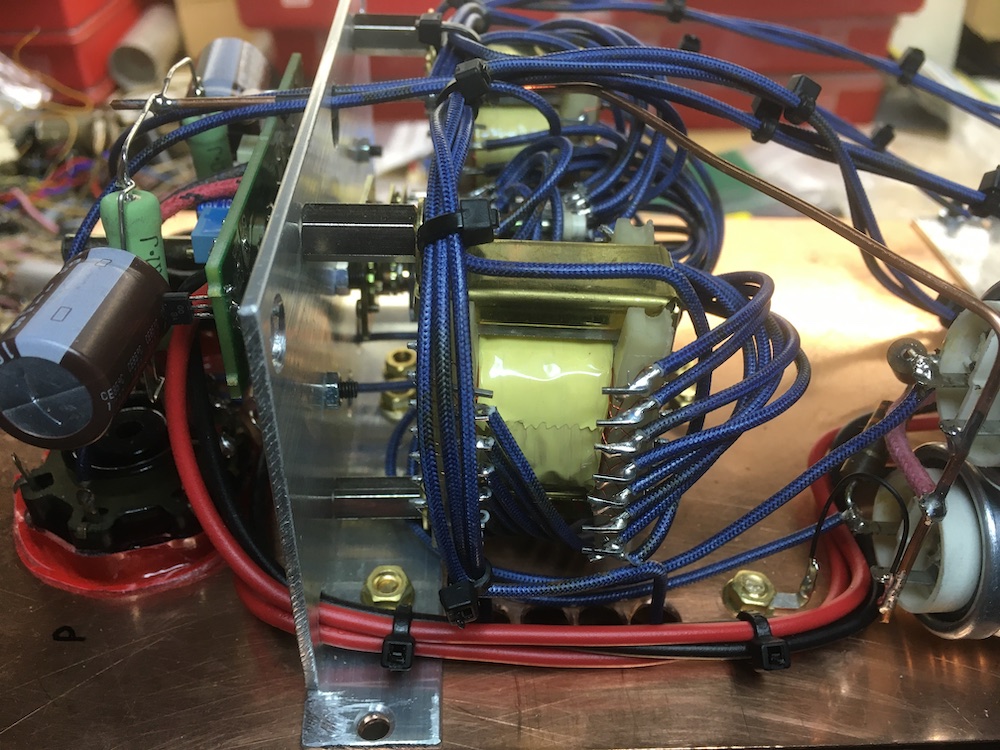
First layer carrying the transformers and sockets plus filament capacitors. Second layer are the MKP-in-oil
capacitors..
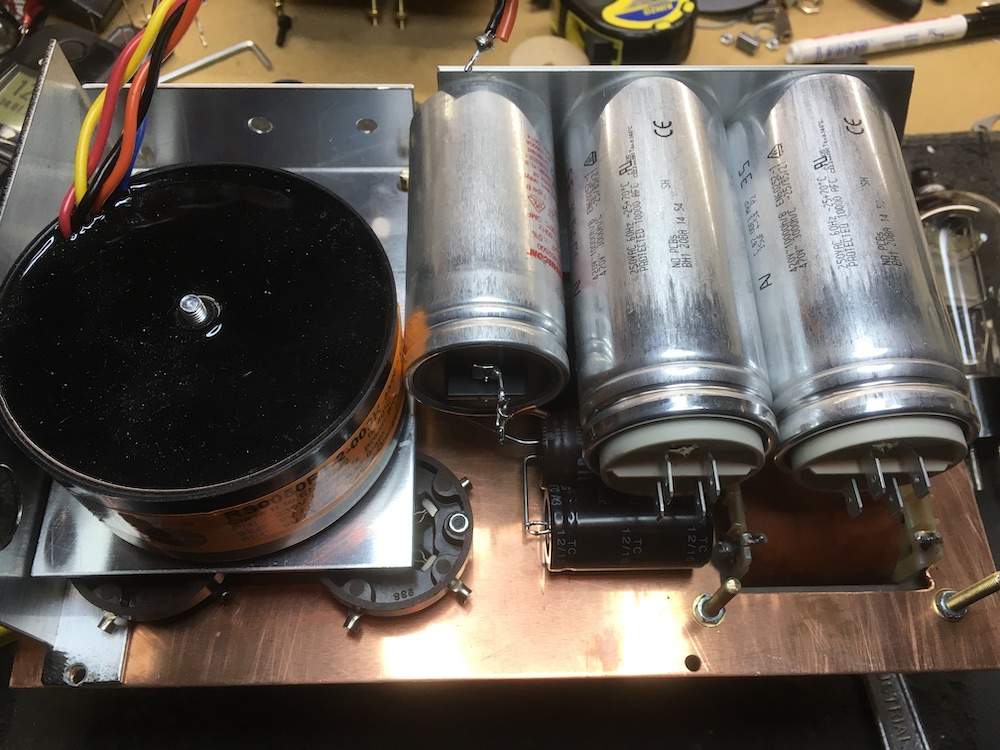
..and the toroid transformer for filament voltage..
..and bridge rectifiers. There is also a switch for two different high voltages.
The chassis almost ready, only to be treated with Danish oil for a darker look.
Learning on the job.. (1)
A first testrun is always exciting, no matter how many amplifiers I have built. The preamplifier powered up really
nice, no sparks visual in the rectifiers as I am using 25µF where a maximum of 15µF is recommended per datasheet.
However that is when using them at maximum voltage and current which I am not even close to. Filaments are dead-silent,
I know that for sure by experience. There was a minor 100hz hum audible coming from the high voltage. Adding 20µF per channel
fixed that (for now). All ready to go? Yes, but.. there was a but.. Most power valves are microphonic and so are
these. That was to be expected but I can assure you when it actually happens it sill is disappointing. Now what? Changing
from Tungsram to Philips solved some of it but not at all acceptable. One neat trick is using a larger step-down
ratio. That can be done by parallelling the secondaries of Alexanders' transformers, from a 2.7:1 to 5.4:1 ratio. That got
rid of lots of unwanted information but unfortunately also gain. Putting in a step-up input transformer fixed that. A
Tamura 1:4 (600 ohm to 10 KiloOhm) fits nice next to the sockets. It makes no sense to use the autoformer at the
input so I rewired it parallel to the output with the taper as output signal. Using a 600 Ohm input impedance has
advantages since it is less susceptible to hum. The Slagle autoformer can handle up to 8 Volts RMS at 20Hz so this
will work fine as this will not be present at the secondaries of the line-out transformer in this design. As a last modification
against microphonincs p-sockets with three mounting points were put in, mounted on rubber M3 stand-offs. The last tweak
was taking out four contact springs from both sockets for easier pull out of the AD1's.
All positive? Not exactly.. The penalty is that the line-out transformers have a more limited bandwidth, now from 3Hz
up to 25Khz at -1dB with 80Khz at -3dB.. Now I do think that for a 5.4:1 transformer this is still very much okay!
After these modifications the amplifier is dead-silent, even with zero attenuation! So, indeed learning on the job.
The preamplifier sang for about two weeks and was still running in. Sound was already marvellous, like its
looks..
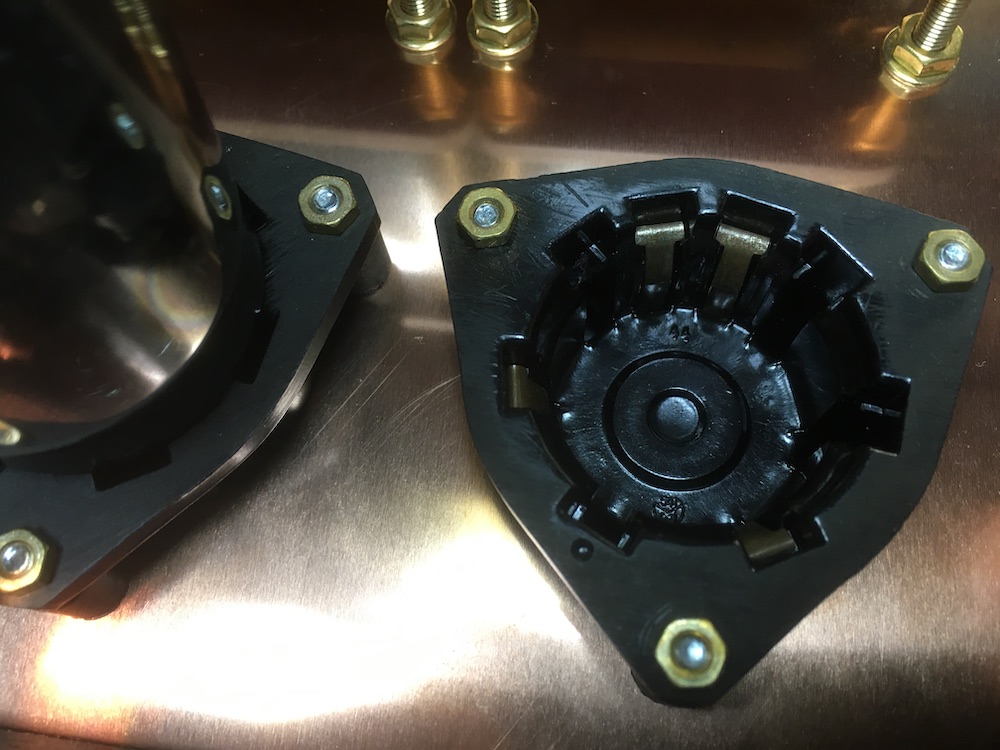
P-sockets with rubber stand-offs to reduce microphonics. Also minus 4 spring contacts for easier removal of the AD1's
Input transformers next to the sockets.
Parallelled the secondaries for larger step-down ratio.
Learning on the job.. (2)
Tuning.. always important. Can we get more out of the design? Not meaning at major component level like transformers but
operating points. I know from experience that some volts difference can sound different as well. So playing around
with the AD1 operating point might change sound for better or worse. Only one way to learn: by doing it. A bit of
hassling around got me to an operating point with slightly more current: 34mA. This was done by lowering the cathode
resistor value from 1K5 to 1K25. Also changing from Kiwame 5 Watt to Allen Bradley 2 x 2 Watt made a big difference
in sound, positive that is.
And there you have it for now. Plans are to put in two extra power supply chokes. These should make it possible to
loose the extra put in 20µF electrolytics per channel..
The schematic. Ideally the two 330 Ohm resistors should be replaced by two chokes and the following capacitors value
lowered to 8µF..
Sound, how about sound? Please be subjective!
Well.. If you have ever heard an AD1 sing.. Really. There is something magical and lifelike happening to voices and
instruments. For me that was the reason trying these in a preamplifier. Together with Alexanders' line-out transformers
this design outperforms all my other preamplifiers in tone, lifelikeness and timbre. It appears to be a really good
combination where tube and transformer merge each others qualities into something special.
Indirectly heated tubes most of the times have more energy compared to directly heated, where the latter most of the
times have better detail and transparency. I have a top-performing EL3N (triode connected) preamplifier that really
excels in low frequency energy, call it bass. If you have experienced that kind of energy once, you need to hear it all
the time. Detail only can not replace that energy. My other preamplifier with the directly heated 4019A uses the very same
power supply and features the same circuitry and reveals more details and translucency but lacks the EL3N's energy.
Most of friends strongly prefer energy over detail, the EL3N. This somehow relates to cathode energy, EL3N has 5.7 Watt heater
where a 4019A runs a 1 Watt cathode. Now the AD1 has a 3.8 Watt cathode but gives energy like the EL3N and detail
and translucency like a 4019A. A perfect performer. Highs are very subtle and have no grain, maybe UX245-like? And
when you think a Western Electric 300B has magical mids, well, the AD1 outperforms the 300B with ease. All AD1's? No,
old stock AD1's do this best, forget newer production which sound more HiFi-like. Tungsram, Valvo, Philips and Telefunken
perform best (in that order). Siemens Ed is different, just like an EBIII and alike. If you want that special sound go
for the afore mentioned quartet. And use some really good matching transformers, like Alexanders'..
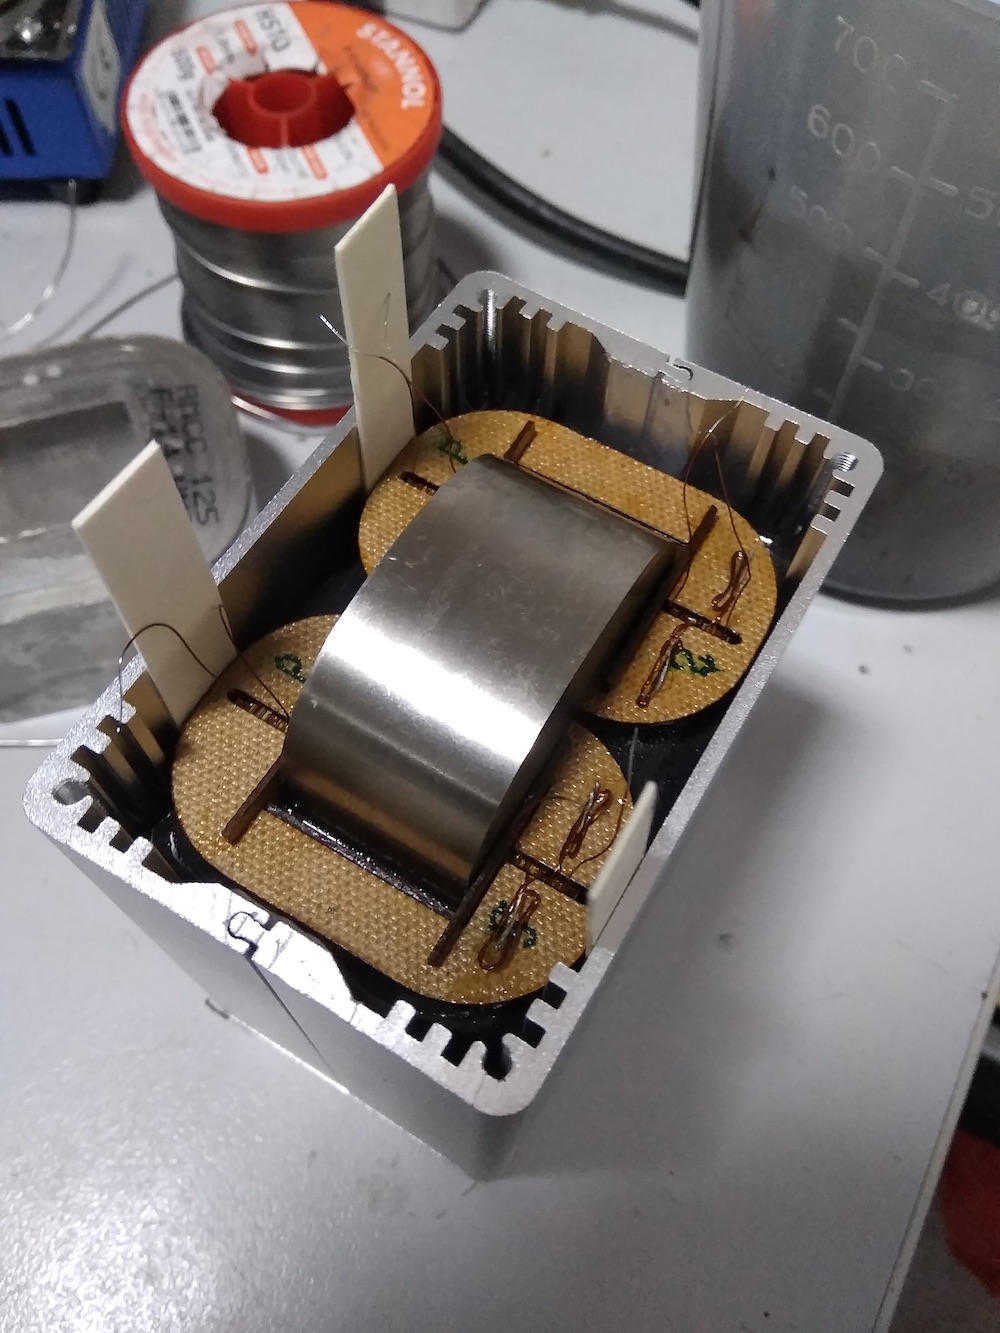
Addendum I: Tuning the line-out transformers.
Together with the transformers came a bunch of wood-chips. All about the same size though different kinds of wood and
meant for fine-tuning the transformers to your taste. How? Well, between the bobbins which carry the windings, there is
some space in which they perfectly fit. It is a snug fit and when they are in the gap they dampen the windings. The windings
carry the signal which excites the core. The excitation of the core can be heard at the transformer itself when you put your
ear close by: Music is audible at a low volume. When the pieces of wood are put between the bobbins their material
composition determines the dampening and influences the tranformers' internal resonance. Cool finding but can this be heard?
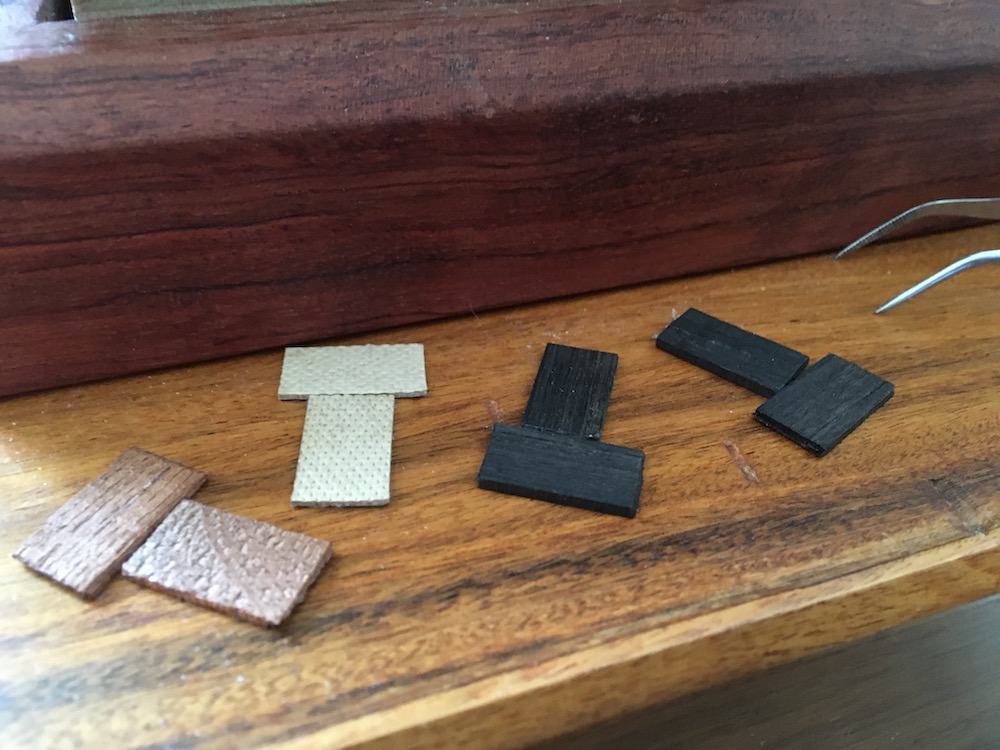
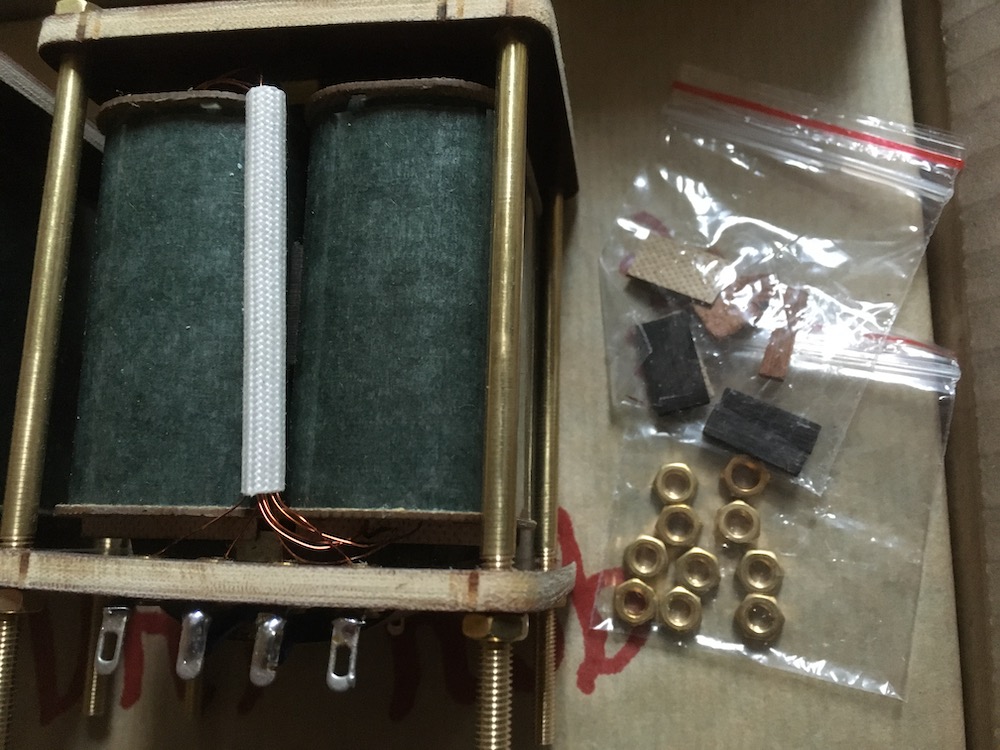
Four pairs of wood chips: Pressed paper composite (2), Indian Rosewood (2) and Ebony (4).
Hit me!
The transformers came with a pair Ebony chips pre-installed. So from the beginning I have been listening to the dampening
effects of these. I deliberately waited for the burn-in period to be finished to be sure that a: I knew the preamplifiers
sound and b: No more fluctuation in sound from burning in was to be expected. That took for about four weeks since
everything in the preamplifier was new and had no mileage on them. So all that I needed now was a pair of pliers or
tweezers to be able to swap and compare. As said, at that time the starting situation was with the pre-installed Ebony
chips. Listening was done together with a friend who has about the same preference in sound like I do.
Pressed paper composite.
So, the Ebony chips were taken out and the pressed paper composite chips were squeezed in. The big question at that
time was if any change in sound could be noticed. That only took for about 20 seconds. Yes sound is different. As reference
recording we chose Herman van Veen, a Dutch folk-sanger who has tremendous articulation and is meticuously recorded on
the Harlekijn label. Right after the needle hit the groove, it was clear that the sound of the piano had changed. Not a
lot, but noticeable for sure. The piano had less weight, notes were not as distuinguishable from each other as with the
Ebony chips inserted. Herman's voice also had less depth and was not as articulated as before. Also sounds did not appear
out the the black as with the Ebony chips. Remarkable. Some other records followed, but the difference was the same. Less
weight and less black, so to say. Time to move on and insert the Indian rosewood chips..
Indian Rosewood.
Putting these in between the transformers cheeks resulted in a noticeable difference again. Nice. These were more like the
Ebony. Less lightweighted compared to pressed paper chips but more organic sounding. Especially on acoustical instruments
the Indian rosewoods chips excelled. Voices were more toneful but not as articulated as with Ebony. Womens voices were
more natural sounding and petered out like never before. Really interesting. So, back to black?
Ebony.
Yes! Articulation and weight on just about every detail were back. Love it. Natural timbre was back to most instruments and
with weight. It is like a note that plunges down in stead of falling down. This is overall the best combination in this
preamplifier. It might be that in other applications the other chips match better. Might be. But here in my system Ebony
wins, hands down.
Ebony to the maxx.
As said, there were four pieces of Ebony supplied: Two already installed and two extra. At first Alexander had not told
what wood was supplied, so I had to guess. The Ebony ones were quite easy to recognise but the pressed paper and rosewood
were hard to identify. Also I noticed that the two extra black chips could be Ebony as well but I assumed that these would be different
material and thus thought it was blackwood. So when we listened first to the Ebony, and at last to the second Ebony pair,
we did not know it was the same material. Interestingly we were the most enthusiastic about that second pair. Yes, we made
a mistake by not going back to the first pair and noticing that it essentially was the same material.. That is,
if we would have noticed a difference..
What we did came up with, is putting all four Ebony chips in between the bobbins, effectively damping a bigger surface. This is
how it still is now. All the effects remain, maybe a tad better, most certainly not worse. →Happy!
Naked?
Yes, we listened as well with no chips between the bobbins. The outstanding quality of the transformers remain, but once
heard the effect of tuning, one "needs" it..

One Ebony chip in between and..
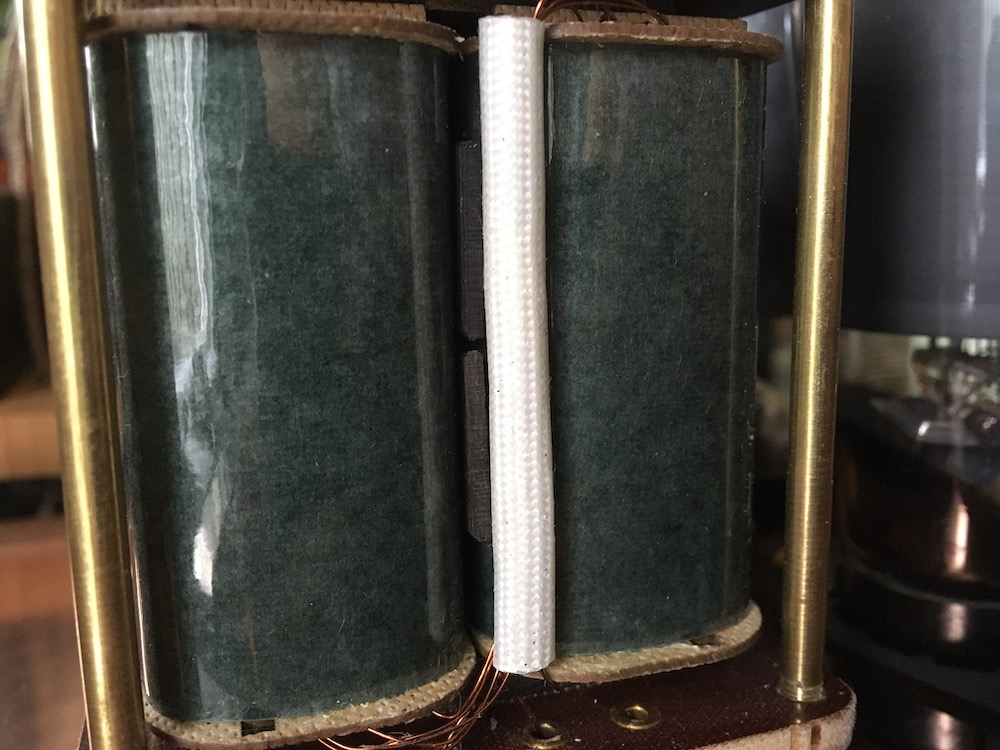
..two Ebony chips put in between.
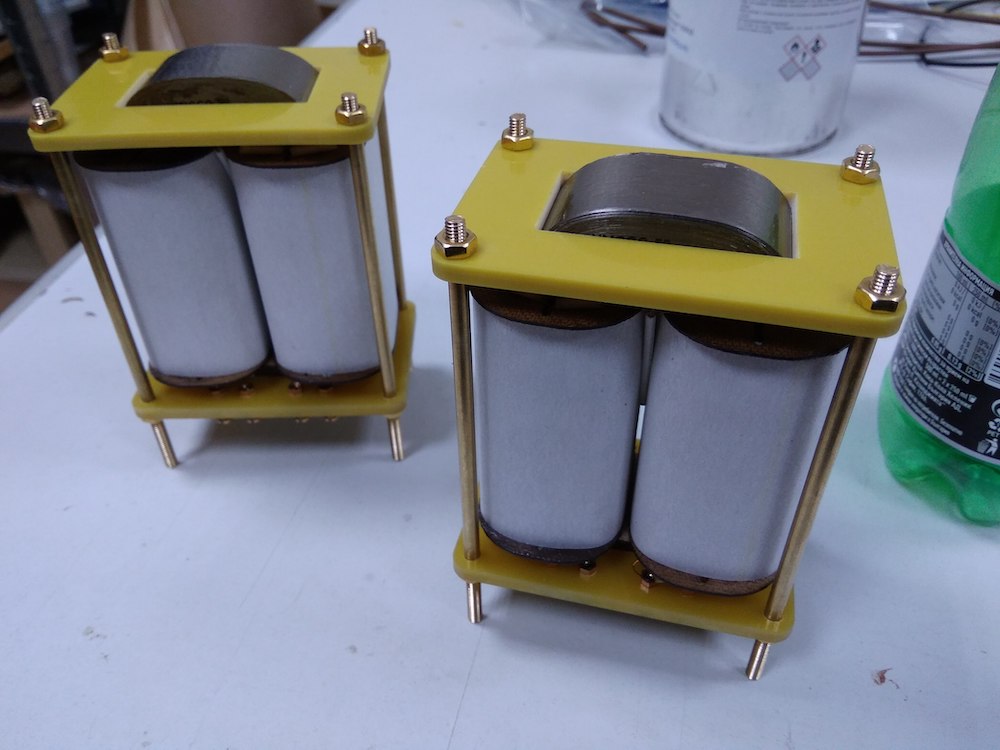
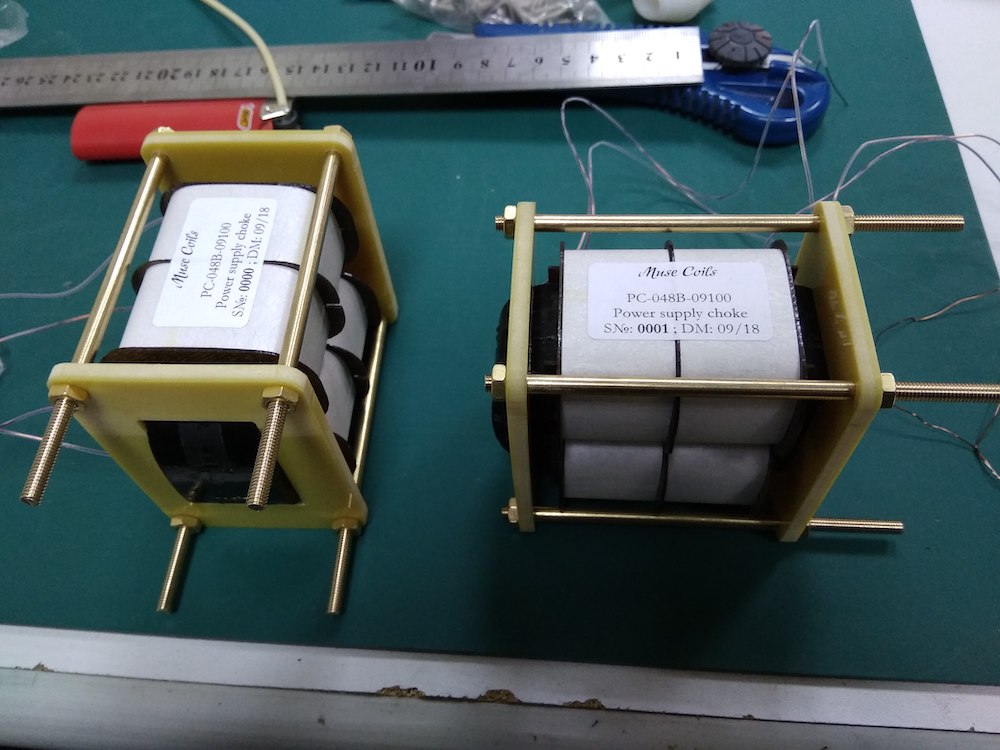
And then came the chokes..
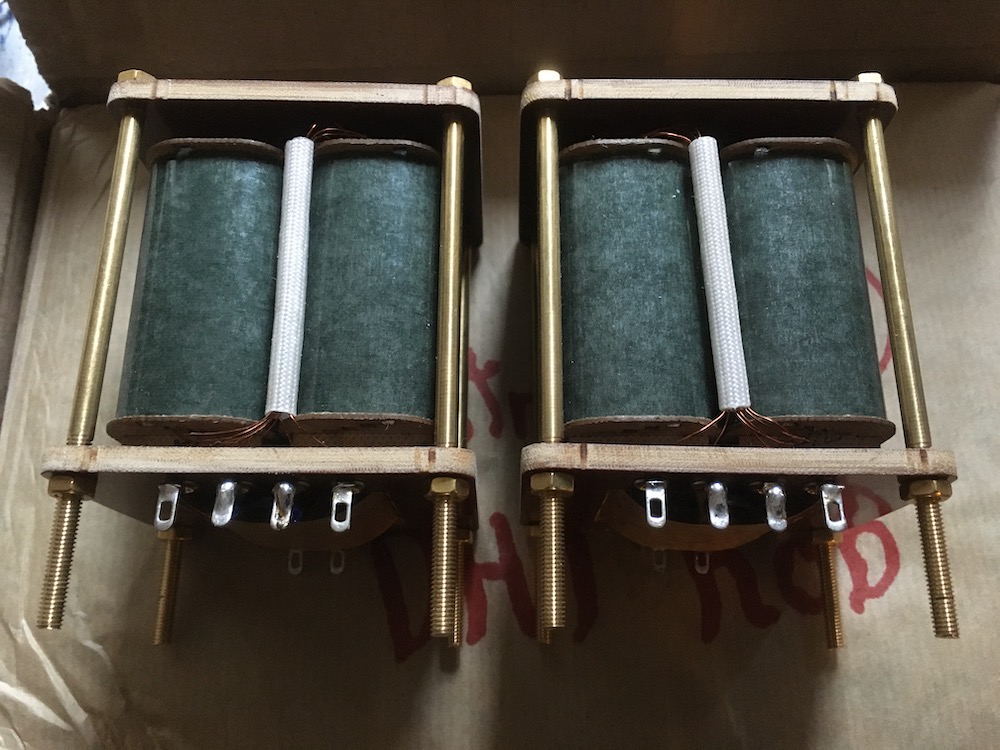
Alexander offered to use nanocrystalline cores as he had some available. Smallish but capable of handling 40mA DC-current which
fits nicely per channel. The chokes are wound on two bobbins, multichambered, and have 4 leads. So can be connected in
single ended, common mode and differential mode. According to Alexander nanocrystalline is mostly airy and really transparant. As a
winder he has to take care not to construct them with aggressively sounding dielectrics, otherwise they can become
unforgivingly biting..
Made alike the line-out transformers.. with ebony chips preinstalled!
Let's put them in..
I used them single ended as the DC-resistance matched just about the resistors value to be replaced. This way the
resistors could be taken out and the capacitor value lowered to 8uF. To be sure that placement of the chokes right after
the line-out transformer introduces no hum due to their stray-field, I decided to first place them on top with leads coming out
of the chassis. This way orientation can be adjusted if necessary. Interestingly orientation had no audible effect on hum,
probably the stray-field is so low that no hum is injected in the line-out transformers. Cool.
I must say that this was done by listening only, not by measuring. Why? Well, the improvement was so huge that I did not
bother to do measurements, yet.. really.
Temporarily placement behind the line-out transformers.
Improvement?
I am still flabbergasted.. more energy was expected but the amount underestimated, especially in the
mid/low region. And the tone, the tone.. and timbre of these gems are unmatched.. BEAUTIFUL! Serious, a very SERIOUS
upgrade this is.
Removing resistors in the power supply and replacing them by a chunk of (exclusive) iron with lots of meters of magnet wire
apparently results in a sort-of blood-transfusion for the preamplifier. Energy poors in and has a tremendous effect on
mid- and low-end response. It is almost like an octave is gained. Yes, this is an upgrade one can only wish for..
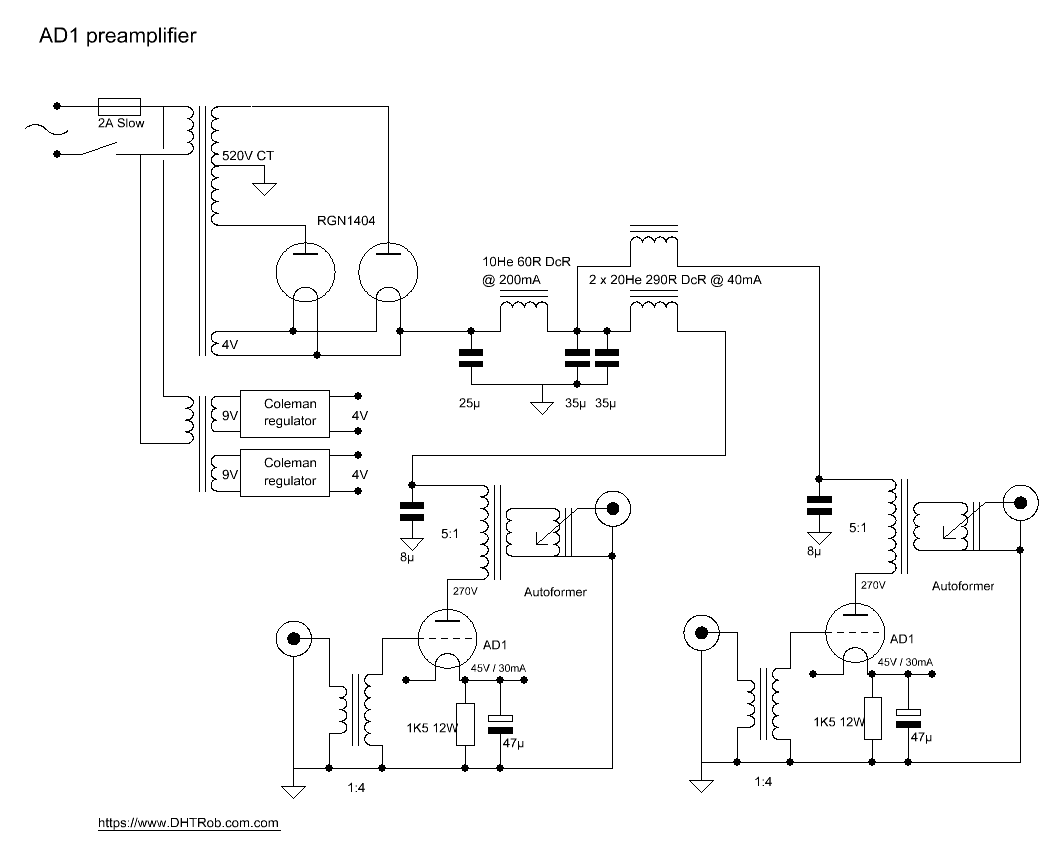
The definitive diagram..
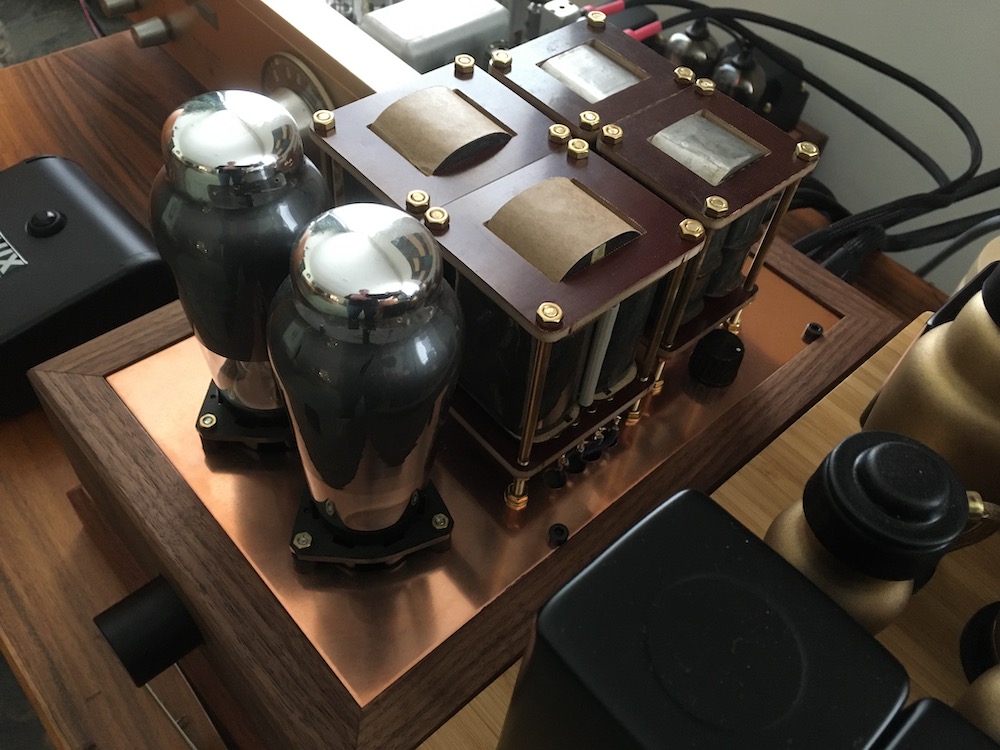
The completed build.
A "no R just C" preamplifier?
A few years ago I got some ludicrous resistors from Dave Slagle. Essentially these were just long thin copper wires
spooled to match the needed resistance. A bit unhandy to mount but I found a way by putting the spools between two
wooden discs. I use them to bias a type 10 at 20mA. Supersound. So I came to the idea to ask Dave if he could make
me some for the AD1. A resistance of 1K3 at 35mA, could that be done? He promptly reacted and wrapped his mind around
it and came with a solution. You can read about it on his blog. He calls it the worst resistor ever. Well, read it and you get the idea.
On the blog article he made an interesting statement: "Well if you look at it on the most basic level a resistor
is simply a really crappy conductor. Given the extremes we go to for the quality of our signal wiring it isn't beyond
reason to me that a longer length of a superior conductor with all of the baggage that it comes with may be better than
an alloy specifically done to impede conductance." Yes! I like that and it must be true, it must be..
Installing them.
The US Postal service did not take long to get the package to my address 😷. I made a photo with a AA battery for size
comparison.
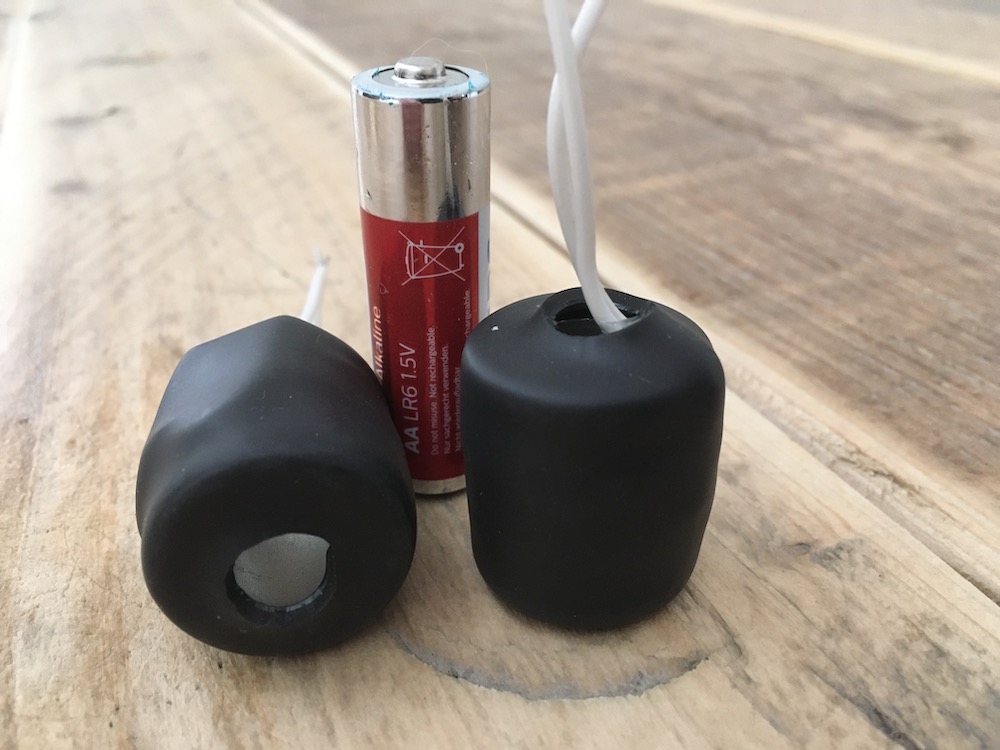
About 2.5 x 2.5cm and with long enough 20awg leads for easy mounting.
They are wound on a hollow aluminium tube for cooling and finished in black heatshrink. These are temperature
controlled, meaning that with temperature differences resistance will fluctuate as well. So mounting vertically for airflow
through the resistor. Stable temperature equals stable resistance. Even though it is a tight fit, I managed to do this.
The underside of the amplifier is open and next to the sockets are ventilation holes as the sockets themselves are not
round and mounted on rubber standoffs. So all seems to be well. Let's have a look.
The resistors replace a pair parallelled 2 Watt Allen Bradleys..
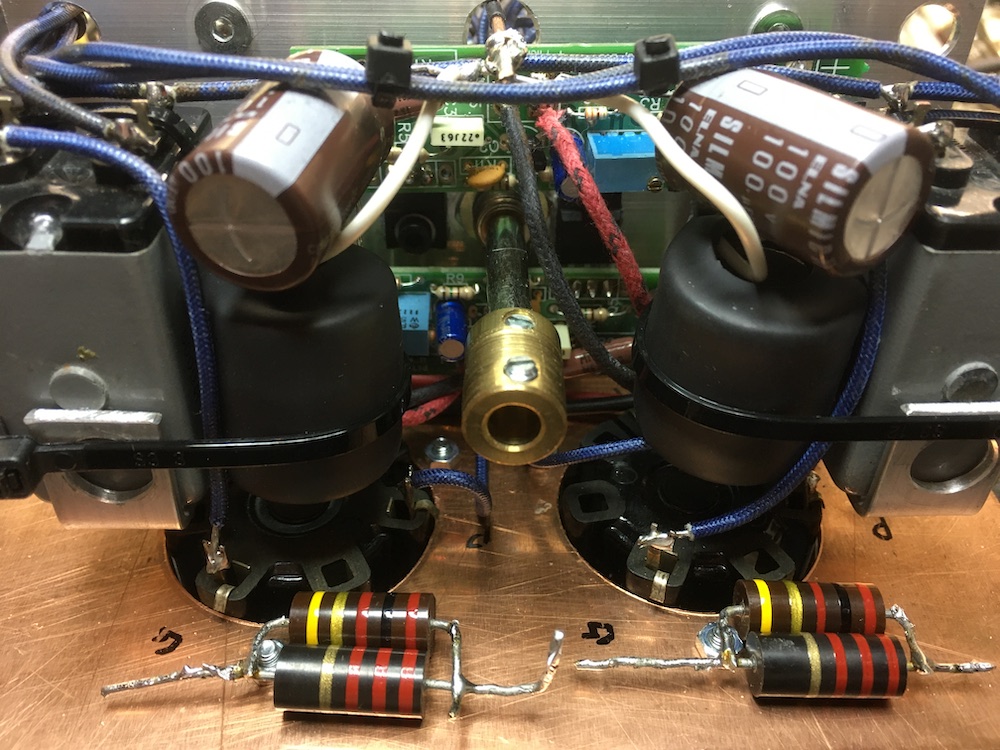
Installed vertically, gently tie-wrapped to the input transformers, removed Allen Bradleys in the foreground.
Putting power to the amplifier confirms that the AD1's run a bit hotter compared to normal operation, but
already after 10 to 15 minutes this stabilises to the chosen operating point. Since there is some headroom for the
tubes, power supply and line-out transformers this is not at all a problem (talking about a rise in current of
<5 mA per AD1). Within the normal warming-up phase these are also up to specification. So let's put them into
business!
Listening..
Do they need to run in? Oh yeah. At first use they sounded horribly sibilant. Luckily that kinda disappeared within the
hour.. to come back again.. and disappear again.. The intervals got smaller and the difference as well. After about
five hours of music listening this effect was not noticeable anymore (or I got used to it 😀). Also the low end
response needed some weight, at least compared to the Allen Bradleys. That also needed some hours to happen. I had to
wait for these two aspects, but the one thing that was there from the beginning, is an incredible clean mid. The tiniest details
were better to follow, micro information was plenty. As example, at Roger Waters Amused to death there are these Q-sound
effects which emerge to the left and right from you like a running television program or voices telling stories. Never
before it was so easy to clearly understand what was played or said. So more detail and thus analytical? Remarkably yes,
but with no negative effects on tone or timbre (the real-factor). Also voices get more throat with more harshness on the edges,
just like how harsh a voice can sound in real life. Some music fooled me several times as I thought there was someone
ringing the front door what always annoys me when I am listening music. Imagine my face when coming to the door and no one
is there and then realising that a doorbell-alike sound was in the music. Cool. So now I have to pay real good attention not to
miss someone at the door.. It is really remarkable how revealing these crazy resistors are. Hearing this, Dave must be right with
his remark about resistors being crappy conductors..
If you like contemporary music, the ECM label has up 'till now released three albums by Nick Bärtsch, phenomenal
music and well recorded like all ECM-records (well, the album Awase being a little less in quality, imho). On the album
LLyria suspense is build up using drums and percussion, that suspense becomes even more palpable because of the revealing
aspects of these resistors. This effect is hard to describe, as it is not about detail like more clarity on vocals,
but about microdetail that adds to the senses. As said, hard to explain but the mind kicks in immediately followed by the body.
Yes, this is emotion, what music is all about. And I can go on, on Manhattans Jazz Quintet's live at the Pit Inn, the sax
and trompets get that live-like glare on copper/metal when pushing the instruments to the limits. Just like with live
performance when it becomes almost not pleasant but still is.. tapping your feets..
Damn, if they don't sound good - But they do!
This should be a no-brainer. If you like your tone and wish for more detail without losing that tone, I would suggest to drop
Dave a line (or two). I have no clue up to what
resistance and dissipation these can be built, but reckon that everything below 1K3 and 35mA dc-current will be possible.
And the price? Well, what is a realistic price for something that is custom built? If you look at boutique resistors
like Audio Note silver tantalums and Duelund carbon cast resistors, these are pricey and are machine made. So how much
for these? Well, ask Dave, these have to be built-to-order anyway. I heard him say anywhere around $50 to
$70 a piece. Expensive? Yes, lots of money for a resistor, but this for sure is not a crappy conductor..
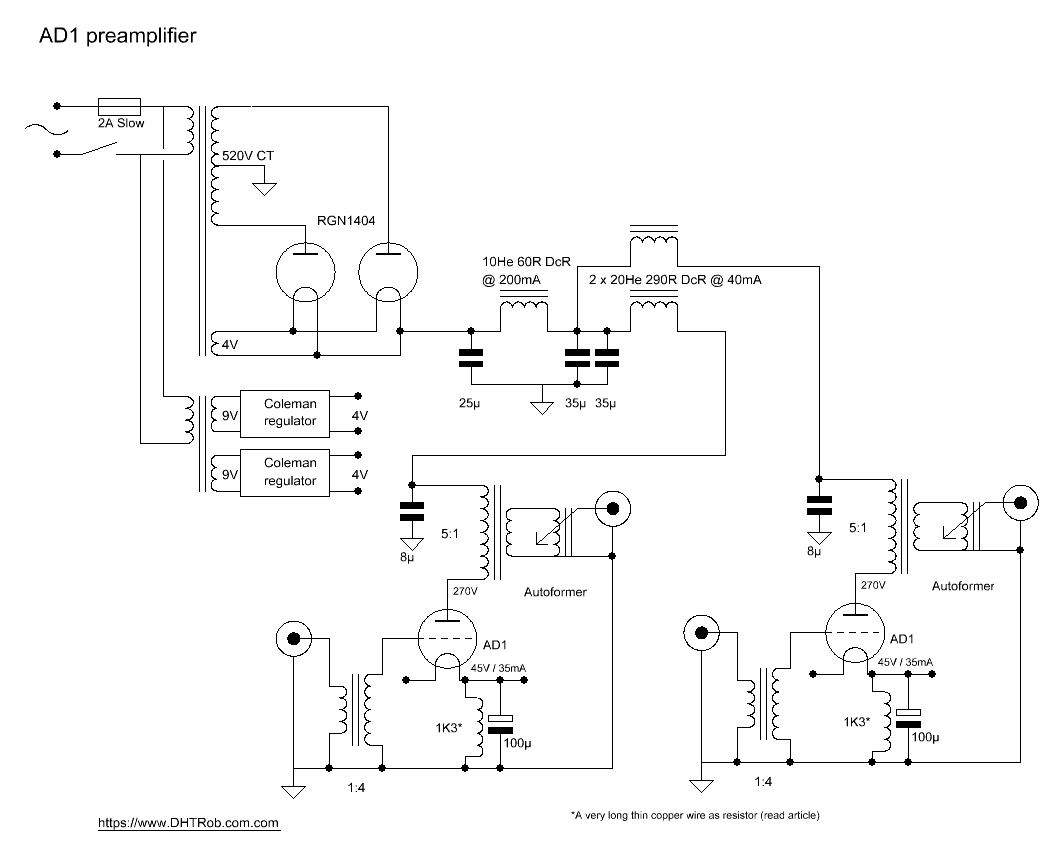
Diagram of the "No R just C" preamplifier (changed cathode resistor and better sounding operating point)
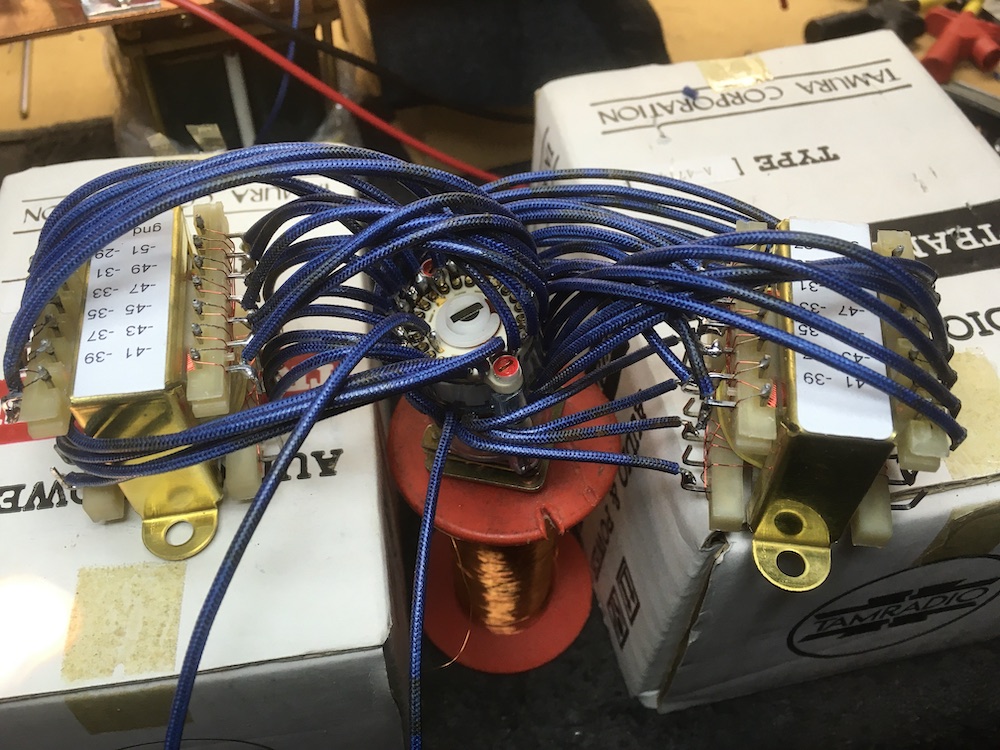
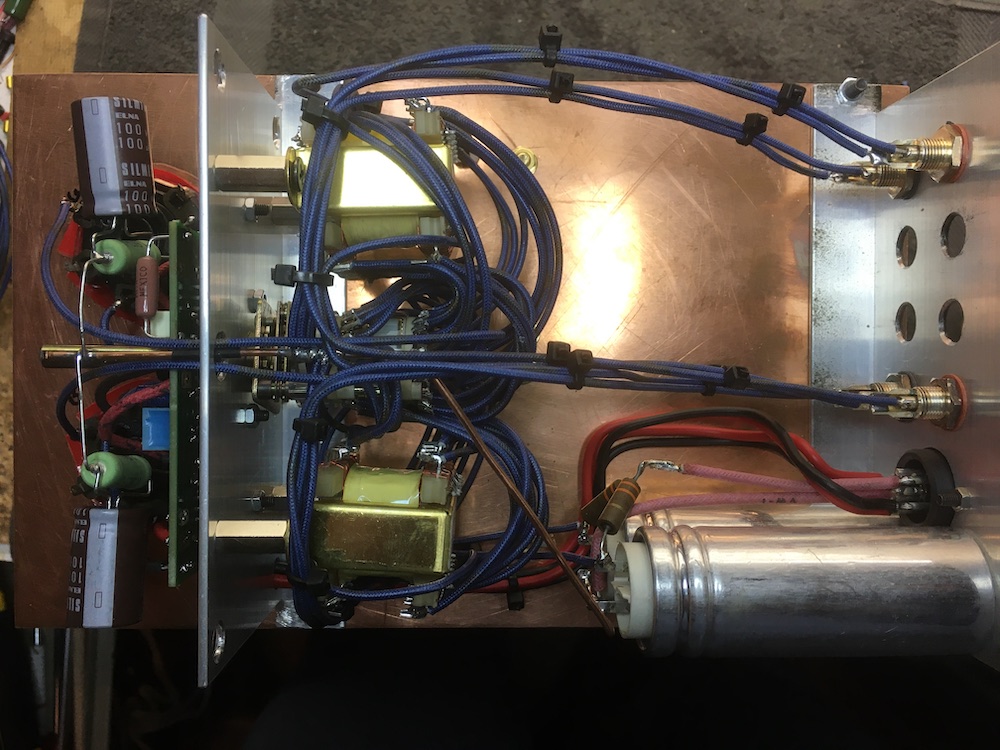
Some detailed pictures of the completed build:
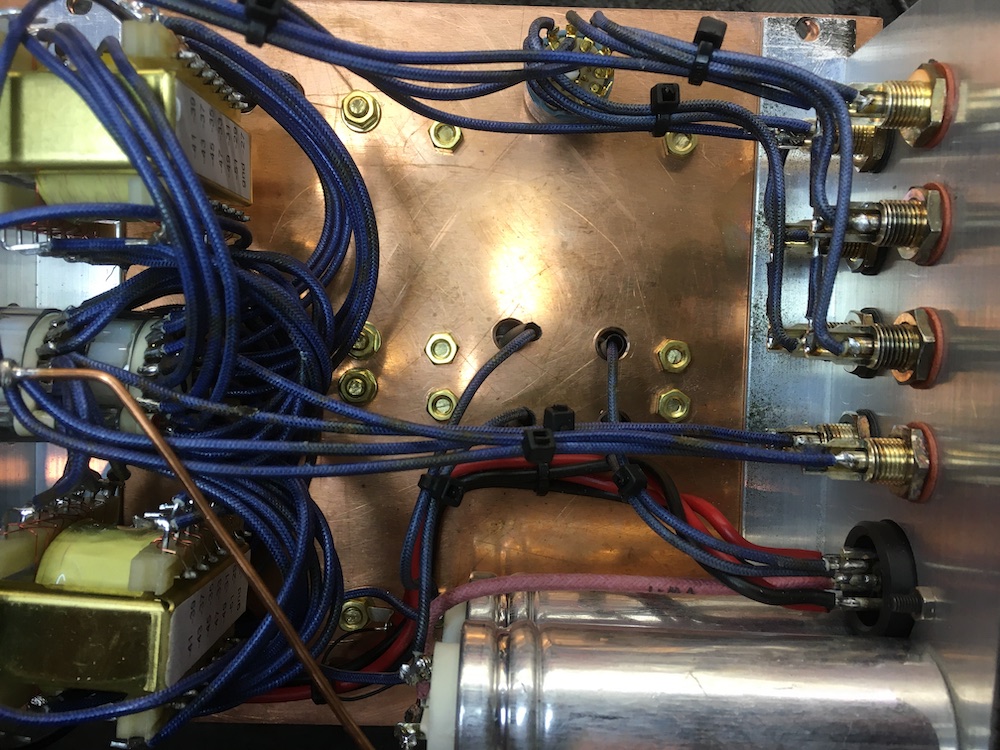
Incoming signal and source selection (small Elma type 01 switch)
Overview with central placed Elma type 02 switch for the 28 step Slagle autoformers
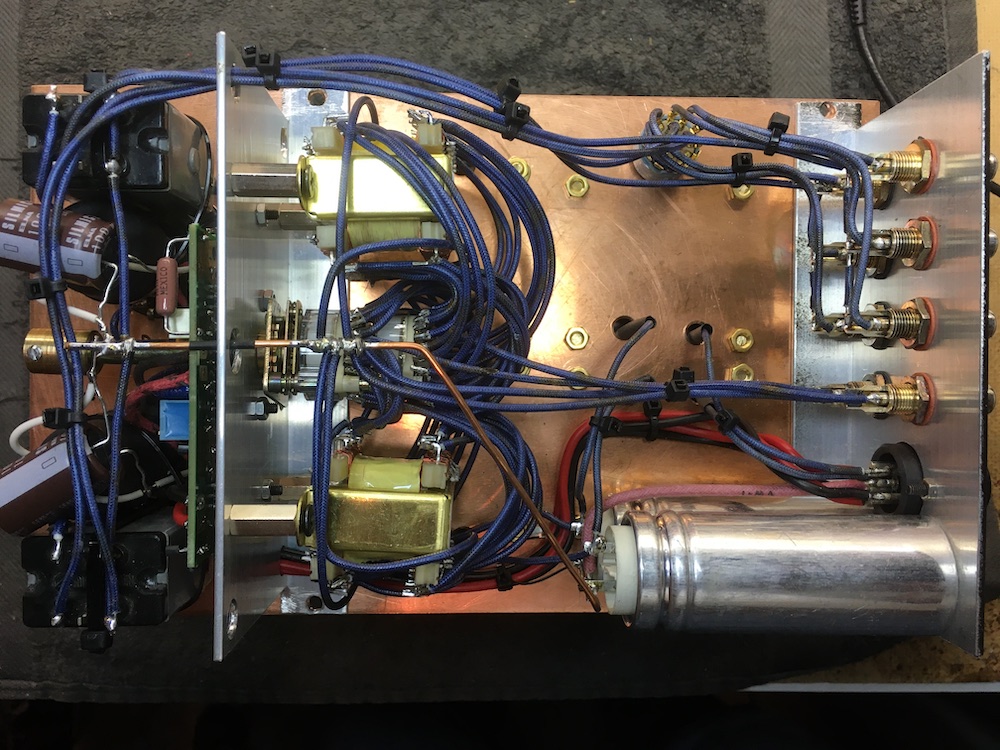
Birds eye view of the complete signal part
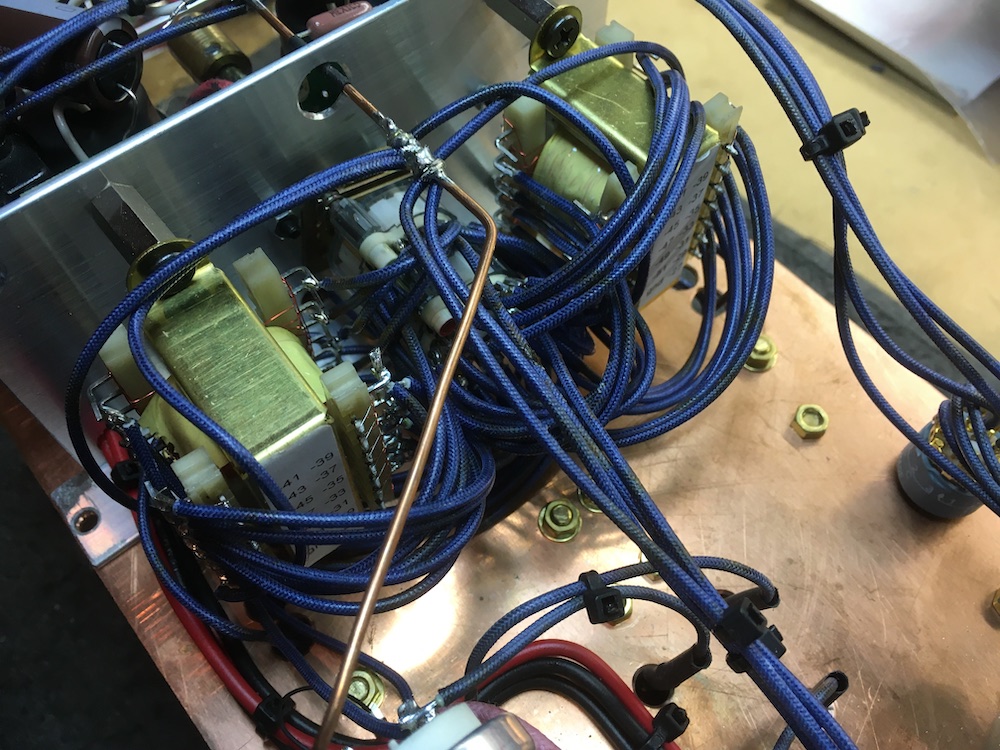
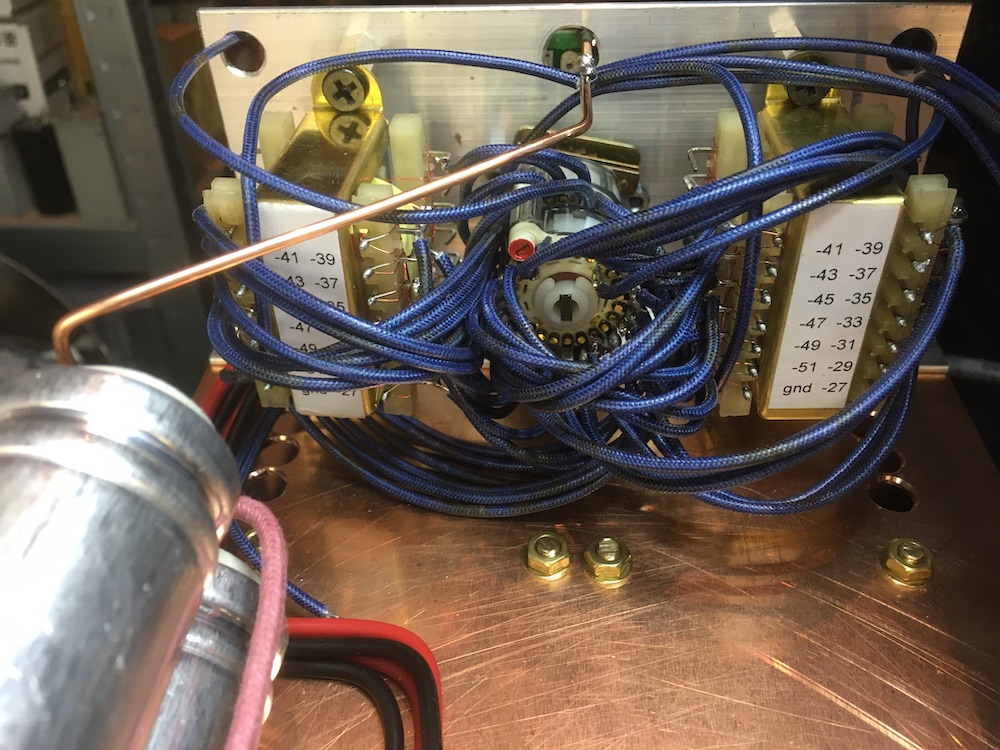
Cloesup of the rats' nest wiring for the autoformers
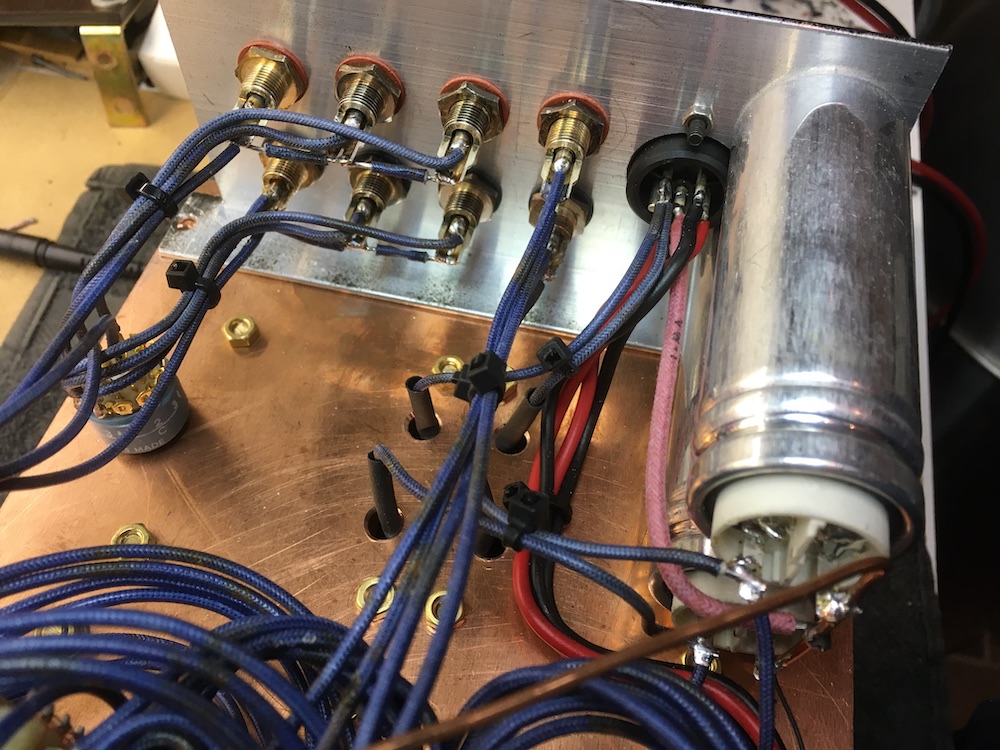
Signal paths, incoming, outgoing and the 8&micr0;F supply capacitors
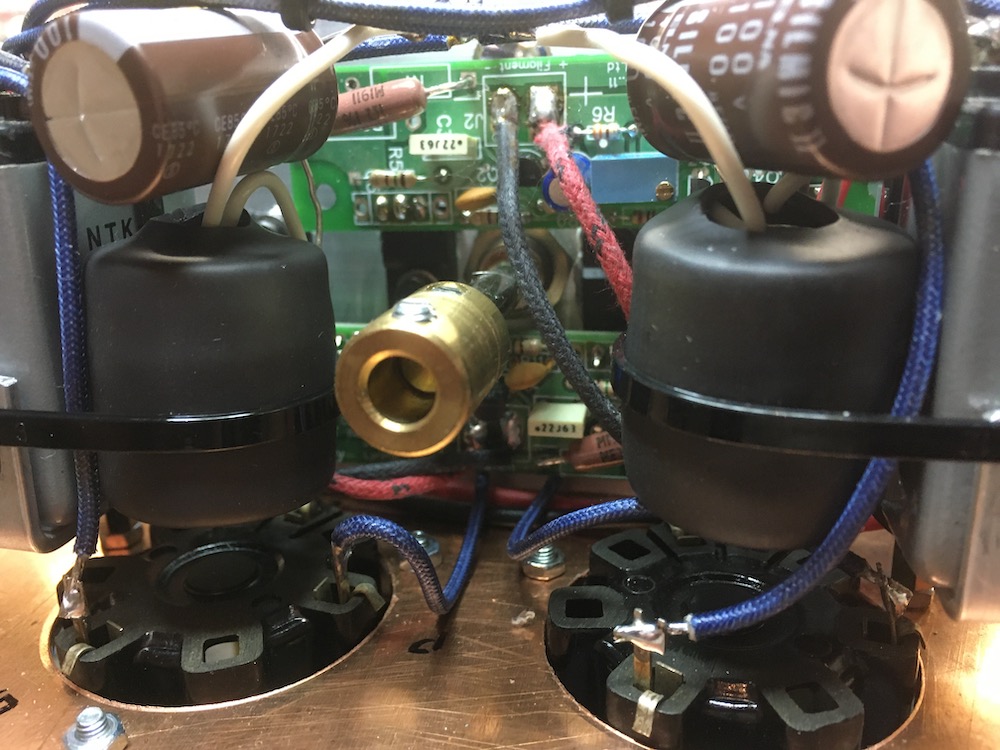
Input transformer, cathode decoupling and in the back the Coleman boards for clean filament power supply